Enter a purchase requisition
Find this screen
Open: Purchase Orders > Enter Purchase Requisition in the Self Service web app.
Open: Purchase Orders > Purchase Requisitions > Enter Purchase Requisition in the Sage 200 desktop.
Watch a video
Enter a purchase requisition (video)
How to
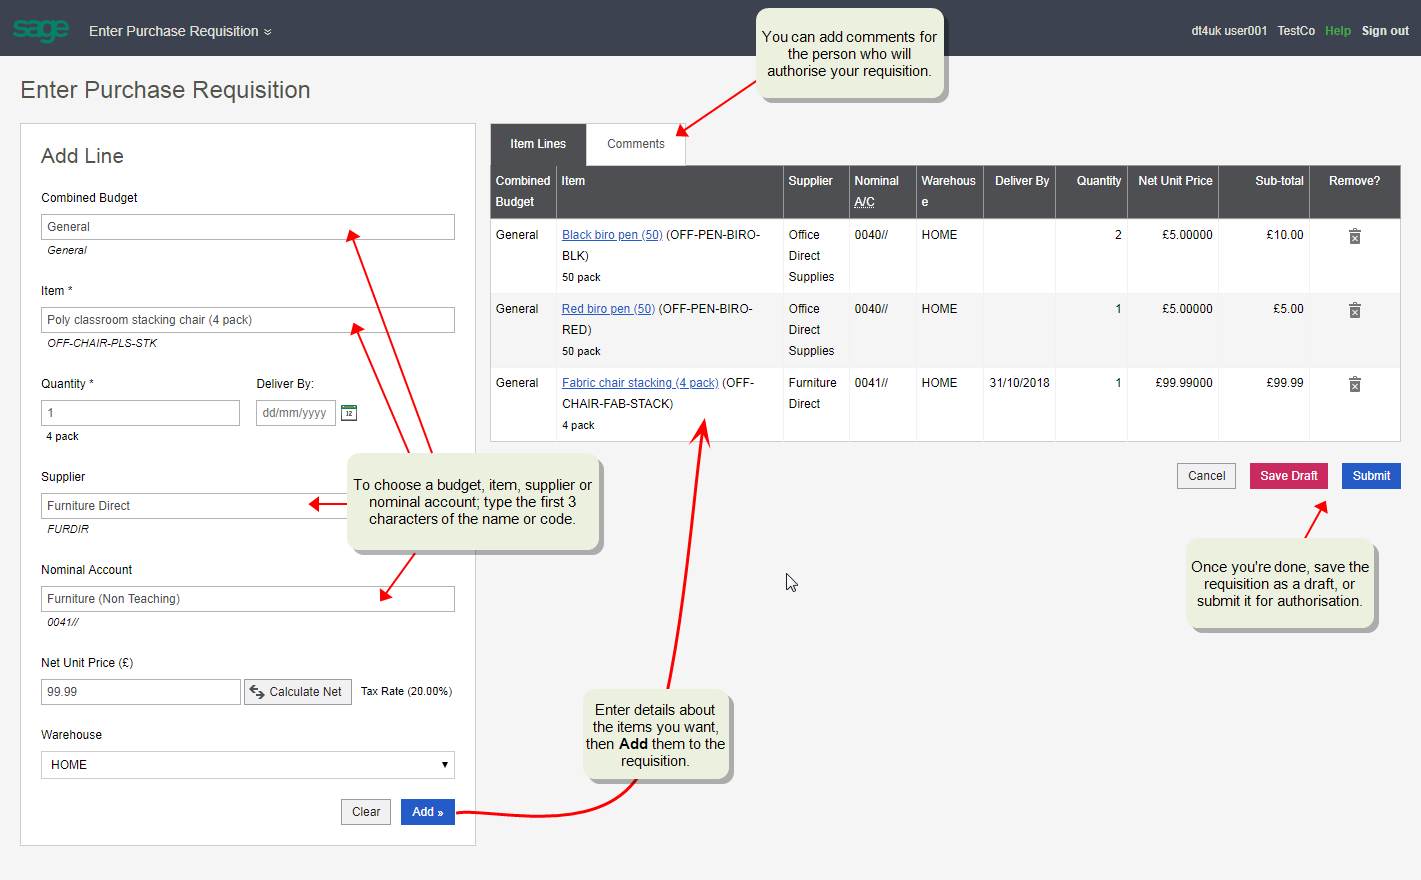
Enter a new requisition
-
Add a line to the requisition for each item that you want.
Item *
Enter a name for the item.
You can enter a description as free text, or choose a stock item (if you use them).
Tip: To find a stock item, type three characters from its stock code or name.
Quantity *
Enter the number of items you want to order.
If you've selected a stock item, the item's units are displayed below the quantity. This just shows you how this product is generally bought, such as in individually (each), boxes, or bottles.
Deliver By
If you need the item by a particular date, enter a Deliver By date. Supplier **
Select a Supplier, if you know who will supply the item.
Tip: To find a supplier, type three characters from its code or name.
Nominal Account **
This is completed automatically with the nominal account Name if you have selected a stock item or supplier. The Code is shown underneath.
You can change this if you know which account to use.
- To find a nominal account, type three characters from its code or name.
-
To search for nominal codes with a particular cost centre
For example:
- Searching for /FAF/ will show all nominal codes with a cost centre
- Searching for 4//ADM will show all nominal codes starting with 4 and with a department of ADM.
- Searching for /FAF/ will show all nominal codes with a cost centre
-
If you have selected a combined budget, you may only be able to select nominal accounts that are included in that budget.
This behaviour can be changed in POP Settings by selecting Nominal account is included in the chosen Combined Nominal Budget.
Where does the default nominal code come from?-
If you have selected a stock item, the nominal account will come from the default nominal account for Stock, set on the stock item record. This will take priority over the supplier's default nominal account.
- If you have selected a supplier and entered free text as the stock item, the nominal account will come from the default nominal account set on the supplier's record.
- If the supplier's default nominal code includes a cost centre and department, these will be appended to the stock item nominal code.
- If you select a Combined Budget, the nominal account should be included in that budget. If the nominal account isn't included in the combined budget, you'll see a Nominal Account Out of Range warning when you add the line.
Net Unit Price
Enter the net price of the item.
- The price is displayed if it's available for this stock item and supplier.
- You can enter your own Net Unit Price for the item, if you know what it will cost. The expected VAT rate for the item is displayed.
- If you've selected a supplier that uses a foreign currency, enter the price in the supplier's currency. The currency symbol for the supplier is displayed; e.g. you'll see a £ for pound sterling or EUR for Euros.
- If you only know the gross price (incl. VAT), click Calculate Net. This calculates the Net and VAT from the gross price for you.
Where does the stock item price come from?If the stock item has a preferred supplier and that supplier is selected on the requisition, the price can either be the:
- Last buying price: The price of the item the last time it was ordered.
-
List price: A price that is manually set for that supplier on the stock item record.
Note: No price will be displayed if the stock item is set to use List price, but the list price has expired.
Warehouse
Select the Warehouse where the item should be delivered. If you've not set up additional locations, this will the Home warehouse.
Note - information* You must enter the Item name and Quantity.
** You only need to enter the Supplier and Nominal account if you've set these to be required details in the purchase requisition settings.
-
Click Add to add the item to the requisition.
You can keep adding more items to the requisition.
-
If you use budgets, select the Combined Budget, which will only be used for this line in the requisition.
Tip: To find a budget, type three characters from its name.
What budgets can I see here?You can select a budget here if you use combined nominal budgets, which are budgets for a group of nominal accounts.
The budget you select here only applies to this item in the requisition.
In schools, requisitions are typically entered against a budget, and the authoriser will be the budget owner.
- When you've finished adding items, save or submit your requisition.
- Select Save Draft if you want to come back and change the requisition before it's submitted.
- Select Submit to send the requisition for approval. You can't edit the requisition once it has been submitted.
Add comments to a requisition
You can add comments to a requisition, for example you may want to add some notes for the person who will authorise it.
-
To add a comment to a requisition, select the Comments tab.
The comment applies to all lines in the requisition, and can be seen by the authorisers and the purchaser.
Amend a draft requisition
You can amend a requisition that has been saved as a Draft, but not requisitions which are Submitted.
Open: Purchase Orders > My Purchase Requisitions in the Self Service web app.
Open: Purchase Orders > Purchase Requisitions > My Purchase Requisitions in the Sage 200 desktop.
-
Select the requisition number in the Document No column.
The requisition is displayed.
-
Make any changes to the requisition.
- To amend a line, select the Item Name from the list, then change the details and click Update.
- To remove a line from a requisition, click Remove
 .
. - If you change the Combined Budget, it will only apply to this line in the requisition.
Useful info
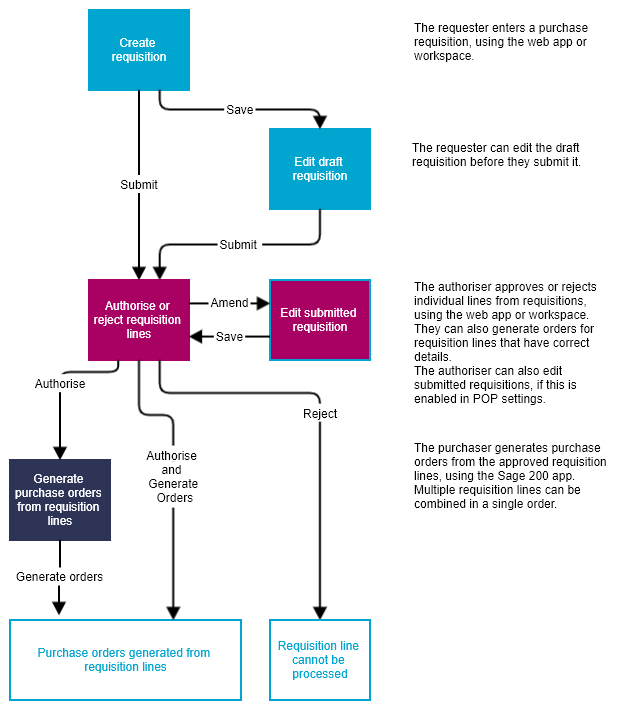
How is the requisition processed?
-
The requester (the person who wants the items or services) enters a purchase requisition. They can submit the requisition if it is ready for authorisation, or save it as a draft if they need to come back and make changes.
-
The requester only needs to enter basic information, such as a description and quantity. If they know more details, they can include information such as the price, stock item code (if you're using stock items), supplier, budget, or warehouse. They can also include a comment to be read by the authoriser and purchaser.
- Additional details required for the purchase order can be added later by the purchaser, when they generate the order.
-
-
The authoriser checks each individual line (item) from a requisition, and can approve or reject the line. The authoriser can also generate purchase orders for items.
-
The authoriser might be a
In schools, requisitions are typically entered against a budget, and the authoriser will be the budget owner, typically a head of department.
- If the authoriser rejects the requisition line, they can include a comment for the requester to explain the reason.
- The authoriser can generate purchase orders at the same time, provided that the requisition line details are complete and can be used to generate an order.
- The authoriser can also add or amend lines in submitted requisitions (if you enable this option in POP Settings).
-
-
The purchaser checks all the approved requisition lines, completes and corrects any missing details, and then generates purchase orders for the requisition lines.
- The purchaser may be someone who works in a purchasing role,
- The purchaser will need to complete any missing details in the requisition line, such as choosing a supplier, or selecting a stock item instead of a free text description. (Sage 200 desktop only)
- The purchaser chooses how to fulfil the requisition line; for example, items may be need to be ordered, taken from existing stock, or ordered from multiple suppliers. (Sage 200 desktop only)
- If there are multiple requisition lines for the same item, these are combined into a single purchase order from the same supplier.
- The purchaser may be someone who works in a purchasing role,
Questions
Type three characters from its code or name, and Sage 200 will start looking for matches.
Yes, just enter the description in the Item line.
No, you can't add charge and comment lines to a requisition.
After you submit a requisition, it must be checked by an authoriser, who will approve or reject each line in the requisition. Once a requisition line is approved by the authoriser, it can then be used to generate a purchase order.
You can't go back and edit a purchase requisition once it has been submitted. If you are not ready to submit the requisition now, then save it as a draft and return to it later.
When you create a requisition, try to include as much detail as you know about an item, as this will help when someone generates the order later on.
- You must include at least the Item name and Quantity.
- The Supplier and Nominal account must be entered, if you've chosen these as required details in the purchase requisition settings.
- If you don't use stock items, or don't know which one to choose, you can just enter fee text for the Item description.
- You might not know the rest of the information, such as the Supplier, or the Net Unit Price, or the Combined Budget (if you use budgets); but these details can be added by the person who will generate the order from the requisition line.
- You will only see the Combined Budget option if some combined nominal budgets have been created in Sage 200.
Open: Purchase Orders > My Purchase Requisitions in the Self Service web app.
Open: Purchase Orders > Purchase Requisitions > My Purchase Requisitions in the Sage 200 desktop.
- The Status column for the requisition shows whether its Submitted and Draft.
-
The Authorisation Status and Rejection Status columns for the requisition show if lines in the requisition have been authorised or rejected.
- The Status column for the requisition line shows if requisition lines are Authorised or Rejected. Lines with a Submitted status have not yet been authorised or rejected.
You can delete a requisition that has been saved as a Draft, but not requisitions which are Submitted.
Open: Purchase Orders > My Purchase Requisitions in the Self Service web app.
Open: Purchase Orders > Purchase Requisitions > My Purchase Requisitions in the Sage 200 desktop.
- Tick the box to select the requisition, then select Delete.
If you submit a requisition but it remains as a draft, it means that there are no authorisation rules which cover your requisition.
If this happens, contact your system administrator and let them know that your requisition can't be authorised.
For example:
- You have not been included as a requester in the authorisation rules.
- Your
This message is displayed if the Nominal Account code is not included in the Combined Budget.
A combined nominal budget is set for a group of nominal accounts. If the nominal account in the requisition line isn't included in the combined budget, then this means the transaction will not be recorded against this budget.
This is just a warning, and you can still submit the requisition if the details are correct.
This means the Nominal Account isn't allowed because:
- Your nominal accounts don't include this nominal code, cost centre
- The nominal account exists, but it is not contained in the selected combined nominal budget. This behaviour can be changed in POP Settings by selecting Nominal account is included in the chosen Combined Nominal Budget.